 "...not with a bang, but a whimper." It was about four years ago I had my stroke. I have been recovering ever since, Most of the time I feel pretty "normal", except for limited stamina and still suspect balance. Today, though, I paid for my diminished skills with a crash that sent me to the emergency room. On a short ride that included a trip to the bank, I crashed on a left turn into the bank parking lot. I was rolling down to the turn in the left-turn lane, but had to wait for oncoming traffic to clear. When the traffic had cleared I turned, only to realize I had overshot the turn. In my pre-stroke days, I easily had the skills to correct and ride through, but today I started wobbling through the turn. I probably could still have made it, but I compounded my lack of skill with a first class bush league error: I looked right at the curb I wanted to avoid. I went chest-first into the butt end of the guardrail. In my previous life teaching young equestrians, one of the greatest truths I tried to impart to them was, "Look where you're going or you'll go where you're looking!" Well, today I have numerous contusions and abrasions, a hematoma, a muscle pull, and a couple of lacerations, including one on my left index finger that nearly took out the extensor tendon and required seven stitches, because I failed to follow my own advice! My bicycling is going to be curtailed for the next few weeks, and this effectively, and disappointingly, ends our quest for the BikeMaine 2017 ride. ~ Tony

Monday, July 31, 2017
Look Where You're Going or You'll Go Where You're Looking
"...not with a bang, but a whimper." It was about four years ago I had my stroke. I have been recovering ever since, Most of the time I feel pretty "normal", except for limited stamina and still suspect balance. Today, though, I paid for my diminished skills with a crash that sent me to the emergency room. On a short ride that included a trip to the bank, I crashed on a left turn into the bank parking lot. I was rolling down to the turn in the left-turn lane, but had to wait for oncoming traffic to clear. When the traffic had cleared I turned, only to realize I had overshot the turn. In my pre-stroke days, I easily had the skills to correct and ride through, but today I started wobbling through the turn. I probably could still have made it, but I compounded my lack of skill with a first class bush league error: I looked right at the curb I wanted to avoid. I went chest-first into the butt end of the guardrail. In my previous life teaching young equestrians, one of the greatest truths I tried to impart to them was, "Look where you're going or you'll go where you're looking!" Well, today I have numerous contusions and abrasions, a hematoma, a muscle pull, and a couple of lacerations, including one on my left index finger that nearly took out the extensor tendon and required seven stitches, because I failed to follow my own advice! My bicycling is going to be curtailed for the next few weeks, and this effectively, and disappointingly, ends our quest for the BikeMaine 2017 ride. ~ Tony

Sunday, July 30, 2017
Yankee Homecoming Ride - 27 miles
Had a wonderful ride with Judy and Debbie today from Ferry Park, West Newbury to State Street, Newburyport. We took in the Yankee Homecoming festivities in Newburyport, perused the classic cars and the art show on Bartlett Mall, then Jogged off down the Clipper City Rail Trail, past some interesting sculptures, to Haley's Ice Cream for some sustenance. We returned to Ferry Park via Maudslay State Park, and a loop around the Lower Artichoke Reservoir. By the time we got to Coffin Street to wend our way back along the river, we were all pretty sore and tired - a very fulfilling day. ~ Tony

Photos by Debbie
 |
| Judy and me at Bartlett Mall |
 |
| On the Clipper City Rail Trail |
 |
| On the Clipper City Rail Trail |
 |
| On the Clipper City Rail Trail - one of the sculptures along the way |
 |
| of course, it's the one we paused at, because it's a HORSE! - photo by Judy |

 |
| Total Gain: 1202 ft; Max Grade: 10% |
Weather: 81°F, sunny
Terrain: rolling
Distance: 27.41mi
Speed: (avg) 10.96 mph; (max) 35.7 mph;
Average Cadence: 68 rpm
Terrain: rolling
Distance: 27.41mi
Speed: (avg) 10.96 mph; (max) 35.7 mph;
Average Cadence: 68 rpm
Wednesday, July 26, 2017
First 20-miler This Year - Arlington Pond
After a few short rides this week with Judy and friend, Preston, today I rode solo my first 20 miler this year. Our Arlington pond loop with a jog-off from Shore Drive onto Zion Hill, and again from Bridge Street down to Maple and up Howe, to avoid the deer flies on North Street. I know what you're thinking, "Deer flies! Why don't you just outride them?" Well, North Street is, for me, anyway, a fairly challenging hill, and I can't muster the speed to outrun the deer flies. Anyway, Howe street is a bit longer, and an equally challenging hill, so it works out. Today I felt pretty good for most of the ride, including Zion Hill. I started doing the shuffle after about an hour and a half, but no great discomfort. Howe Street was grueling in bright sunlight with no shade. My legs were getting tired, but I finished well enough, and recovered well enough, with only a momentary drop in post-ride BP. Going for another short ride with Judy this evening. ~ Tony |
| Total Gain: 895 ft; Max Grade: 9% |
Terrain: rolling
Distance: 19.48 mi
Speed: (avg) 10.55 mph; (max) 43.4 mph;
Average Cadence: 67 rpm
Sunday, July 23, 2017
Ferry Park - Maudslay Park Loop - A Delightful Ride
Today we rode with our friend, Debbie on what is probably our favorite short ride, our scenic river loop starting at Ferry Park, West Newbury, across the Rocks Village Bridge, along the river through Merrimac and Amesbury, over the Chain Bridge into Newburyport, through Maudslay State Park, up Pipestave Hill, and back along the West Newbury side of the River. This was the first time this year I've done over ten miles without discomfort.The weather was perfect and the company was convivial. I watched my heart rate more than my mph, and finished strong. I did not experience any lightheadedness afterward, and my blood pressure when I got home was normal. Things are looking up. ~ Tony |
| Total Gain: 831 ft; Max Grade: 8% |
Terrain: rolling
Distance: 15.56 mi
Speed: (avg) 11.14 mph; (max) 37.7 mph;
Average Cadence: 65 rpm


Friday, July 21, 2017
Recovery Ride
Today I wore my heart monitor and did a short recovery ride over our North Street-Atkinson Street-Broadway loop. It starts with a fairly demanding Hill, followed by a refreshing descent leading to some undulations and finally flattening out for a nice, invigorating run-in. Felt good throughout. Kept my usual effort level. HR monitor confirmed that I was just under anaerobic threshold, around 128 bpm, as I thought. I did a good job of keeping it steady on that point, except going up the top of Lake St, where my HR seemed to go crazy, frantically leaping from 136 to 118 and everywhere in between. I'm thinking that the HR monitor was still settling into place at that point, or I went through some RF interference there. Followed up my post-exercise vitals: BP 106/60; O2 sat: 95. Much more encouraging. ~ Tony |
| Total Gain: 207 ft; Max Grade: 5% |
Terrain: flat to rolling
Distance: 4.7 mi
Speed: (avg) 11.43 mph; (max) 28.55 mph;
Average Cadence: 74 rpm
Thursday, July 20, 2017
Arlington Pond Loop Fail
After a couple of more successful shorter rides and another successful completion of the Hooker Farm Road loop, I felt ready to attempt the longer Arlington Pond loop. I felt good for most of the first half, but weakened thereafter. By the time I got to Shore Drive, where I usually fly, I was struggling: legs felt weak and tired; arms neck and shoulders ached. I decided to abort, and go home via a shorter, flatter return. Very disturbing, because I did hydrate and fuel up appropriately. When I got home I felt a little dizzy as I was bringing my bike into the house. Checked my vitals. O₂ sat was OK, but BP was 90/48! It took almost an hour for my diastolic to hit 60, (normal threshold.) I have a doctor appointment Thursday; will be discussing this with him. ~ Tony |
| Total Elevation: 658 ft. Max Grade: 7% |
Weather: 94°F, hazy
Terrain: flat to rolling
Distance: 16.15 mi
Speed: (avg) 10.74mph; (max) 40.4mph;
Average Cadence: 68 rpm
Sunday, July 16, 2017
Lesson Learned
As a diabetic I have to be careful to fuel appropriately for exercise. Today I made the wrong decision. Our friend Debbie joined us for a morning Bike ride over the Hooker Farm Road loop. I didn't want to ride with a belly full of breakfast, so I just had a mug of coffee with cream and sugar. Felt good for the first half of the ride, but ran out of gas at the base of the steep section at the end of North Broadway and never really recovered. I had no legs by the time we hit the gentle uphill of Hampstead Road. We stopped near the Rusty Lantern Market. After a little discussion we agreed that it seemed my blood sugar had crashed. Debbie was kind enough to buy me an energy bar and a Gatorade, offered with a gentle lecture. We decided to take the easy way home by Broadway rather than tackle the North Street hill.. Didn't feel strong, but recovered well enough to propel myself back at a reasonable pace. I'm lucky to have such good friends. ~ TonyWeather: 80°F, sunny
Terrain: flat to rolling
Distance: 9.69 mi
Speed: (avg) 11.6mph; (max) 33.6mph;
Average Cadence: 72 rpm
Friday, July 14, 2017
Hooker Farm Road including North Street Hill
Today I rode our Hooker Farm Road loop, complete, including the North Street hill, a bit more challenging than the last ride. I've done a few shorter rides in between, pushing myself a little harder, and challenging my legs and cardiovascular system. Today I felt good and strong for the first half of the ride, but had to back off a bit on the steeper gradients and the North Street hill. That hill is fairly long with some steep gradients which, mercifully, present as short steps up the hill. I felt pretty good overall, and didn't suffer much of the discomfort of earlier rides. Ready to take on some bigger distances. ~ Tony |
| total gain: 479 ft grade: 0% max grade: 8% |
Weather: 68°F, cloudy
Terrain: rolling
Distance: 10.12 mi
Speed: (avg) 11.04mph; (max) 32.7mph;
Average Cadence: 69 rpm
Sunday, July 9, 2017
Hooker Farm Road - Easy
 Today we had a nice ride on our Hooker Farm Road loop - Easy, returning via Broadway. It's a little longer and a tad hillier than our last ride, but pretty easy anyway. After our last ride I raised my handlebars to give myself more breathing room. I did the ride again, and it seemed to help. Today I was fairly comfortable for about 2/3 of the ride, but started to feel sore, needing to shift positions frequently toward the end. Our ride was nearly ten miles with almost 400 feet of elevation gain, about one fifth of what we're going to be doing daily at BikeMaine Pathway to the Peaks in September, but it's still early July, so I'm not too worried. I did feel better today overall, and I'm losing weight, so there will be less to lug up the hills in Maine. Judy's doing great, and she's very patient with me on the hills.
Weather: 84°F, sunny
Terrain: flat to rolling
Distance: 9.69 mi
Speed: (avg) 10.96mph; (max) 33.78mph;
Average Cadence: 72 rpm
 |
| As I said before, Veloroutes elevation profiles make flattish courses look much more challenging than they are. This time, though, I didn't doctor it, because, to me, this is actually how it felt. LOL |
Tuesday, July 4, 2017
Shakedown Ride 2017
For a number of reasons we are getting a late start on our 2017 bicycling season. We cleaned, checked, and lubricated the bikes, pumped up the tires, and set off for a short local ride. The bikes performed perfectly, and Judy did very well. My legs felt good, but my shoulders and arms ached, and my heart and lungs were on strike, a concern, because we are signed up for the BikeMaine Pathway to the Peaks tour in September, a week long tour of 355 miles, averaging 55 miles a day, with 16,432 feet of elevation gain! We have some work to do!Weather: 82°F, sunny
Terrain: flat to rolling
Distance: 6.89 mi
Speed: (avg) 11.08mph; (max) 21.91mph;
 |
| If you're familiar with Veloroutes profiles, they tend to make flat courses look challenging, so I doctored it to resemble more closely our actual route. |
Wednesday, October 14, 2015
Crystal Shores - a Splash of Autumnal Color
Over the last couple of days we have hiked in our own back yard on some trails where I used to ride my horse when I was a kid: the Crystal Shores, Crystal Point, and Crystal Gorge Conservation Areas - easy day hikes, but providing some splendid scenery and, at this time, a splash of autumnal color.
 |
| Crystal Point - A goose forages amid the glowing reflections of Autumn. See Gallery |
The first day we did a short hike in the Crystal Gorge Area - some variegated terrain, but, nevertheless, an easy hike. The trails were well-marked, and, even without a map, we managed to make a nice little loop for ourselves. The gorge itself is a small stream between two ridges - fun to negotiate, but far from the breathtaking experience of Ausable Chasm or Quechee Gorge.
 | ||
| Crystal Gorge - We had a nice hike on well-marked trails around and through the gorge. |
 | ||||||||||
| Crystal Gorge - on the trail to the gorge See Gallery |
The next day we hiked the trails of Crystal Shores and Crystal Point. The trails are easy and well-marked, with many jog-offs to scenic views of the lake and inlets. Crystal shores trails, sadly, dead end on private property, but we were able to make a nice loop otherwise.
 |
| Crystal Shores - on the trail See Gallery |
 |
| Crystal shores - Scenic View See Gallery |
 | |||||||
| Map of Crystal Shores and Crystal Point Trails |
From the parking lot at Crystal Gorge, we walked westward down Crystal Street to the entrance of Crystal Shores, followed the well-marked trails with side trips to take pictures, then walked eastward on Crystal Street to the entrance of Crystal Point for another nice loop and splendid scenery.
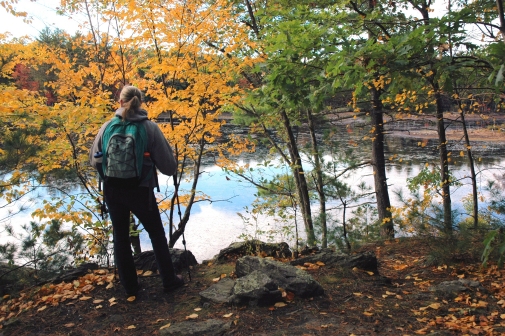 | |||||
| Crystal Point - Judy enjoys a scenic view See Gallery |
It's been a long time since I've revisited this old haunt. It's nice to see the trails so well-maintained, and heartwarming to be treated to this all-but-forgotten scenery. We will definitely visit more often.
Friday, October 9, 2015
Winnekenni - Return to Birchbrow
A few days ago we were hiking on trails from Winnekenni Park to Plug pond, an area we had previously ignored, and discovered and explored some interesting ruins. Upon doing some research we learned these were the remains of the Birchbrow Estate which presided on this hill over plug pond. The centerpiece of this estate was the 30-room Birchbrow Mansion, a grand mansion which was the summer cottage of the Sanders family. More Here and Here. It became apparent that we had only explored the stable, carriage house, guest cottage, cistern, assorted outbuildings and other structures, but had missed the mansion and its grand entry stairs, so we went back and did another hike of Winnekenni with the object of finding the mansion.
We started with a 3 1/2 mile hike around the shores of Kenoza lake, and then followed the Castle Trail to the trails that head down to Plug Pond.

Just below the cistern we stayed to the right, a section we had not previously explored, and there she was.

 |
| Judy knocking on the great door of the Birchbrow Mansion - See Gallery |
Just below the cistern we stayed to the right, a section we had not previously explored, and there she was.
From the site we could still glimpse the shimmering waters of Plug Pond through the trees. It must have been quite a vista back when these were open fields. We explored a little and took some pictures. See Gallery
We returned again the next day for just a short jaunt from Plug Pond with friend, Wanda. We explored some more and took more pictures.
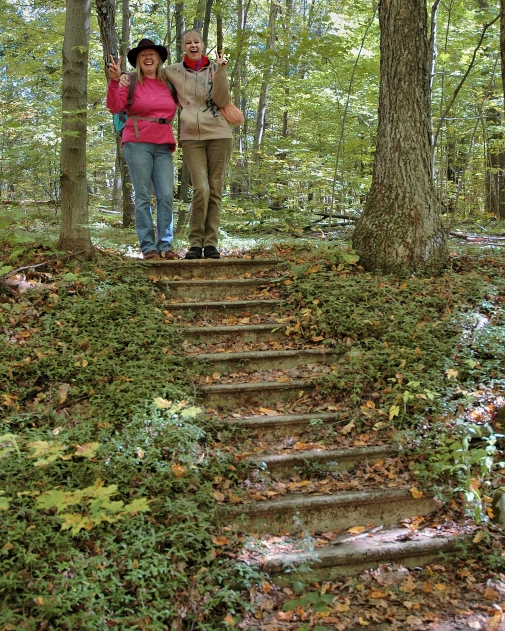 |
| Judy and Wanda atop the back staircase - See Gallery |
It's quite a feeling to explore among such echoes - a hike through time...
Tuesday, October 6, 2015
Winnekenni - Exploring Ruins
Well, it was a quiet summer for us; spent the spring and early summer cutting and stacking firewood, and just couldn't seem to get away the rest of the summer. Here it is, October, now, and we are on vacation. I have acquired some new gear, which I may review later, and took it for a shakedown hike at Winnekenni Park. This time we hiked a section that we had never done before, between Kenoza Lake and Plug Pond, which included exploring some interesting ruins along the way.
Judy has researched the history and origins of these ruins, and here is what she writes:
Our hike started in the dirt parking lot on the right of the Castle Road. We took the trail at the south end of the lot, an easy walk to Plug Pond and along its shores. We went straight up to the Plug Pond parking lot and took a trail on the left, uphill, but still easy. It's on a loop at the top of this hill that we discovered the ruins. We explored the ruins for a while, and took some pictures before heading downhill towards the lake. When we reached the Castle Trail, we took a right and headed down to the lake shore, where we turned left on Dudley Porter Trail. We walked along the shore until we reached the clearing across from the Basin. We went left across the clearing, and were back at the car.
Another nice and interesting walk at Winnekenni Park.
 |
| Exploring the ruins of the Birchbrow Estate see Gallery |
"These ruins were once the Sander's Estate more here. I didn't know it at the time, but we were wandering through the foot print of the 33 room mansion. What a feeling to be walking through lives that came before, and though there have been events that overlay history like layers of wall paper, the original spirit of the land comes though. How I enjoyed that hike. It reminded my of my childhood with my cousins, and the adventures we had through the woods and along the lake, pond and streams near our homes. I was 10 years old again with my team of explorers... "
 |
| cistern ruins see Gallery |
Our hike started in the dirt parking lot on the right of the Castle Road. We took the trail at the south end of the lot, an easy walk to Plug Pond and along its shores. We went straight up to the Plug Pond parking lot and took a trail on the left, uphill, but still easy. It's on a loop at the top of this hill that we discovered the ruins. We explored the ruins for a while, and took some pictures before heading downhill towards the lake. When we reached the Castle Trail, we took a right and headed down to the lake shore, where we turned left on Dudley Porter Trail. We walked along the shore until we reached the clearing across from the Basin. We went left across the clearing, and were back at the car.
 |
| see Gallery |
Tuesday, October 21, 2014
New Goodies for my Ride
I always try to choose pleasant and picturesque routes for our bike rides. For that reason I always like to carry my camera and a couple of lenses handy. The handiest place to carry them is in a handlebar bag where they will be within easy reach on demand. Of course it takes a sizable bag to carry a DSLR and a couble of lenses. I had fitted my bicycle with such a bag equipped with the ingenious KLICKfix Handlebar Adapter. I discovered in short order that the high and forward mounting with this arrangement, combined with the weight of the contents, unpleasantly affected steering and bike-handling, and I right away started searching for an alternative.
One possible solution was a KLICKfix adapter that bolted to the steering tube, below the handlebars, however I wondered if this plastic support for my handlebar bag would be up to the weight of a camera, two lenses and miscellaneous other items, especially on these rough New England roads. The failure of one of the brackets on my handlebar mount this summer confirmed my fears.
In the course of my searching, I had come across the so-called French-style handlebar bags, which are designed to rest on a small rack above the front wheel, and traditionally attach to the handlebars, or to a décaleur affixed to the stem. This lowers the load and brings it closer to the bicycle, thus improving the handling and balance. Since the load is supported from underneath it is also more stable and secure. This all seemed so sensible to me, but these accessories are rather pricey. My research led me to Velo Orange which carries its own line of French-style bags, racks and décaleurs at a somewhat more reasonable price.
I chose, for my purposes, the Velo Orange Grand Cru Handlebar Bag and the Pass Hunter Front Rack with Integrated Décaleur.
The bag rests on small front rack. I found that, even though secured to the décaleur, and possessing an internal stiffener, the bag flopped easily from side to side. The bag can be secured to the rack by passing a strap through webbing at the bottom. I did this and it eliminated the floppiness.
The bag has a large main compartment, a large front pocket, two small back pockets, two shallow pockets on the sides and D-rings for the included shoulder strap. Rear opening, (hinged at front,) top cover secures with
an elastic strap to button on rack insert tab.
The top cover sports a generously-sized clear-view map pocket.

The top cover opens conveniently facing the rider for easy access.

The Grand Cru Handlebar bag easily contains my camera insert with room to spare for a few odds and ends.

The insert holds my camera , two lenses, and a few odds and ends.

The bag rests on this small front rack. The Pass Hunter rack has an integrated décaleur -- a device to which the top of the bag is attached to steady the bag, yet leave the handlebars unencumbered.
Bolted onto the top back of the bag is a bracket with prongs that slip into the décaleur sockets to steady the top of the bag.
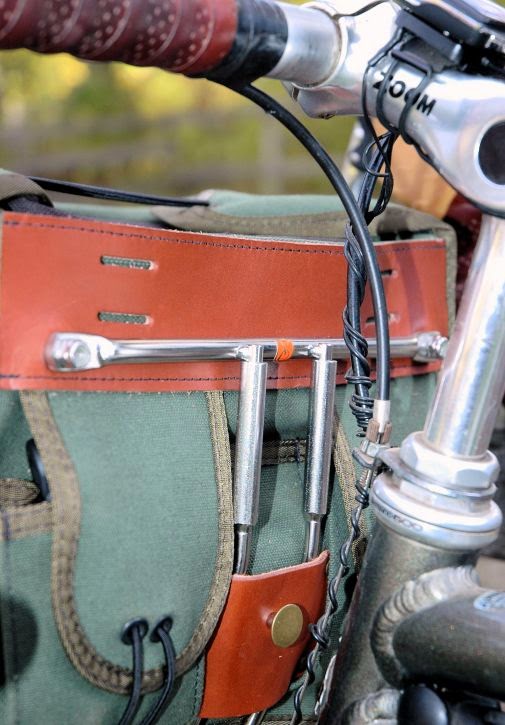
The Pass Hunter rack support struts bolt to the cantilever brake bosses via included double-ended cantilever bolts.

The rear support strut of the Pass Hunter rack bolts through the hole in the middle of the fork crown. On my bike this hole had a threaded boss at the rear, which I had to drill out. I had read horror stories of failed and/or mickey-moused installations of this rack. Luckily for me, everything lined up the way it should, and came together very neatly. The rack tilts backward slightly. I could have used spacers between the rear strut and the fork crown to correct this, but I like the bag leaning in toward me a little, so this is perfect for me.

Here's a comparison shot of how much lower and further back the weight is carried with a French-style décaleur bag versus the popular handlebar quick-mount bags of today. Steering and security are much improved. I think it's esthetically better-balanced as well.

Looking forward to my next picturesque bike ride!
One possible solution was a KLICKfix adapter that bolted to the steering tube, below the handlebars, however I wondered if this plastic support for my handlebar bag would be up to the weight of a camera, two lenses and miscellaneous other items, especially on these rough New England roads. The failure of one of the brackets on my handlebar mount this summer confirmed my fears.
In the course of my searching, I had come across the so-called French-style handlebar bags, which are designed to rest on a small rack above the front wheel, and traditionally attach to the handlebars, or to a décaleur affixed to the stem. This lowers the load and brings it closer to the bicycle, thus improving the handling and balance. Since the load is supported from underneath it is also more stable and secure. This all seemed so sensible to me, but these accessories are rather pricey. My research led me to Velo Orange which carries its own line of French-style bags, racks and décaleurs at a somewhat more reasonable price.
I chose, for my purposes, the Velo Orange Grand Cru Handlebar Bag and the Pass Hunter Front Rack with Integrated Décaleur.
 |
| Velo Orange Grand Cru Handlebar Bag and Pass Hunter Front Rack |
 |
| Velo Orange Grand Cru Handlebar Bag -Front quarter-view showing large front pocket. |
 |
| rear quarter-view showing small back pockets. |
The top cover sports a generously-sized clear-view map pocket.
The top cover opens conveniently facing the rider for easy access.
The Grand Cru Handlebar bag easily contains my camera insert with room to spare for a few odds and ends.
The insert holds my camera , two lenses, and a few odds and ends.
The bag rests on this small front rack. The Pass Hunter rack has an integrated décaleur -- a device to which the top of the bag is attached to steady the bag, yet leave the handlebars unencumbered.
 |
| Velo Orange Pass Hunter Front Rack with Integrated Décaleur |
The Pass Hunter rack support struts bolt to the cantilever brake bosses via included double-ended cantilever bolts.
The rear support strut of the Pass Hunter rack bolts through the hole in the middle of the fork crown. On my bike this hole had a threaded boss at the rear, which I had to drill out. I had read horror stories of failed and/or mickey-moused installations of this rack. Luckily for me, everything lined up the way it should, and came together very neatly. The rack tilts backward slightly. I could have used spacers between the rear strut and the fork crown to correct this, but I like the bag leaning in toward me a little, so this is perfect for me.
Here's a comparison shot of how much lower and further back the weight is carried with a French-style décaleur bag versus the popular handlebar quick-mount bags of today. Steering and security are much improved. I think it's esthetically better-balanced as well.
Looking forward to my next picturesque bike ride!
Subscribe to:
Posts (Atom)